Showing posts with label srm. Show all posts

Sunday, October 25, 2009

2.375" Motor Updated


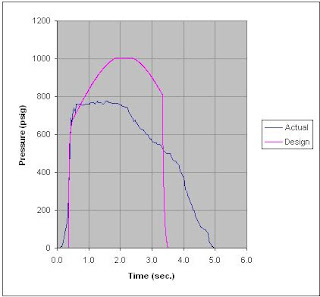
I changed the design again. I decided to optimize the it for KNER propellant by adding two additional segments. The additional propellant brings the motor up to a solid L-class motor and the chamber pressure sims. at right about 1000psi. I'm hoping to have an opportunity to test fire it for the first time in early December
Update: I updated the SRM output to correct a mistake. I had been using the wrong grain OD.

Wednesday, July 2, 2008

Static Test Results


I finally got around to looking at the data from the static test from back in April. The motor was mostly comprised of hardware from a previous motor that I lengthened to make room for another propellant segment. That results in the initial Kn rising from 340 to 425. The other big difference was that I added 1% RIO to the propellant. I also changed the closure method from snap-rings to a bolt-ring closure designed for the increased chamber pressure. The propellant grain consisted of 5 segments in a bates grain configuration weighing 9.247 lbs with a port/throat ratio of 1.5625. The propellant was mixed in a ratio of 65/35/01 (KNO3/Sorbitol/RIO) and cast into 3" mailing tubes that have an ID of 3" and an OD of 3.125". The casing insulation consisted of four layers of rosin paper. The casing and bulkhead are fabricated of 6061-t6 aluminum. The nozzle is fabricated from 12L14 "leaded steel" and had a throat diameter of 0.64" and an expansion ratio of 12.

The total impulse was 1213 LB-Sec (5395 N-Sec.) making it a small M-class motor. I was also pleased to find that the calculated ISP was 131. Slightly higher than I expected given the fact that I didn't spend a lot of time premixing the propellant ingredients and used the KNO3 as received.

There was no measurable throat erosion post firing and the nozzle appears to ready for another firing. When I took the motor apart post test I found that the insulation was severely breached at the bulkhead end. I think that the higher chamber pressure created a much harsher environment for the insulation than I was expecting. The insulation breach resulted in a small blister in the casing about .125" in diameter and about .005" high. I'm happy to replace the casing since it was one of the most out of round 6061 tubes that I have ever purchased. The casing thickness provided for a fairly significant safety margin, so I'm considering pushing the design a bit by using a .065" walled casing which will allow the insulation to be more than doubled and should make for a very lightweight and powerful motor. Overall, I'm pretty pleased with the results.

Saturday, March 1, 2008

Photos from November


Last November my friend James and I participated in a propellant class at the FAR site. James took some great pictures of the days events. The pictures above are of my KNO3/sugar motor and of my AP/AL/HTPB motor. The photo of the composite test was taken during the day but was "stopped down" in an effort to reveal the shock diamonds. Video of both of these firings can be seen here. More of James' photos of the days events are online here.

Saturday, January 19, 2008

Old Launch Photos and Stuff


Going through some old photos and rocket related things recently, I came across some photos from 2002. At that time two of the largest motors that I had were designed around two inch diameter "washing machine standpipe" that I found at Home Depot. I decided to try these pipes at the time because they seemed to be very good quality, good/consistent weld, and dimensionally consistent. They also have a thin (0.035") wall thickness which makes for a very lightweight casing. I designed two motors that utilized this casing material. Both motors used identical casings, bulkheads, and closures, but one was designed to use a single unrestricted grain and the other a single restricted grain. The differences in the nozzles are shown in the drawing above. I was concerned about the low initial thrust of the motor that used the single restricted grain and tried to reduce the weight of the nozzle for that motor as much as possible. In the end both motors ended up weighing nearly the same (1.75 lbs). I static tested the unrestricted motor and the numbers correlated closely to the design. Ultimately both motors flew numerous times at the RRS. They were simple to prepare on site (due in part to the fact that each needed only a single grain and that the motor was used as the casting mould). The motors proved to be durable, consistent, and fun to fly.

In the first photo you can see the casing with its nice shiny zinc coating. It is not that shiny from Home Depot, but the finish didn't take much time. Unfortunately the zinc blistered after the initial firing, so the coating was removed with a quick dip in muriatic acid. The 5th photo shows Peter and I taking the rocket out to the launch tower. The 6th photo shows (from left to right) Greg Coleman, myself, Kevin Koch, and Alan Hoyt lifting the launch tower into position. The 7th photo is Kevin, myself, and Alan. The orange and black aeroshell flew a total of five times at the RRS on three different motors. I made it from three inch diameter heavy walled cardboard tube that Kevin found in a dumpster. The fins were cut from quarter inch plywood and were epoxied on to the tube and reinforced with a layer of heavy fiberglass. The nose cone was turned from a block of pine. Eventually, it became too small for the new motors that I was making and was retired. It was always difficult to adjust the tower for it correctly since it had three fins and the tower at the RRS is built for a four fin rocket.
Photos 6-10 were all taken by Tony Richards.

Monday, October 22, 2007

Static Test

This past Saturday I participated in a sugar propellant class at the Friends of Amateur Rocketry (FAR) facility. Brent Dougherty did a nice job presenting a general overview of how to safely work with and cast sugar based propellants. Thanks to the FAR guys Kevin, Mark, Ted and the others for letting us use the site. They have done an amazing amount of work on the site, including a massive vertical test stand (I don't remember what it's rated for).


As part of the class I fired an L-class KNO3/Sorbitol demonstration motor. The firing went well and good data was collected. This is a simplified set-up from what I've used in the past and it worked well. I'm planning on making some adjustable steel brackets that mount with bolts rather than the cargo straps. Here is the set-up:


In the picture taken just after the firing you can see the nozzle glowing red hot, once I got the motor torn apart and cleaned, everything appeared to have survived the firing just fine. The gauge measuring thrust began to register data about a tenth of a second or so before chamber pressure began to be recorded. I suspect that the pressure port was briefly clogged by the igniter initially. After tearing the motor apart I found a glob of melted plastic that used to be the soda straw that held the BP.

Monday, October 8, 2007

New Motor

Here is a 3D model of the new motor. The insulation is not shown so that the grain assembly can be clearly seen. This motor uses a ring of screws to retain the nozzle and bulkhead that are not yet shown.


Here is a view inside the casing showing a propellant segment and the insulation.


Saturday, May 26, 2007

Four Inch Diameter SRM


This is a four inch diameter motor that I've been working on for a while now. This motor is very similar to the motor that I flew last month. Both motors used 6061-t6 aluminum for the casing and 12L14 steel for the nozzle. The grain geometry was also very similar, with the major difference being that this motor uses six segment instead of four. This motor has been fired twice now. Both firings occurred at the RRS's Mojave Test Area. I normally go out to the site the night before to do propellant/motor prep, then sleep in a tent on site that night. The first firing experienced a burn through in the casing. The motor fired well for most of the burn and damage was limited to the casing, so I was very pleased with the initial firing. I made several small changes to the design; first was reducing the diameter of the casting tubes/inhibitor slightly to accommodate an increase in the casting tube/inhibitor thickness of 15% , lastly the casing insulation thickness was increased by 25%. I consider the second firing to be successful. The ignition was a bit slow, due to much of the igniter material being expelled from the nozzle. The use of a pyrogen canister should solve this problem. I am pleased with the resulting ISP of 127 (ISP being a measure of propellant performance). The important thing for me was that the casing temperature didn't begin to rise until several seconds after the test indicating that the insulation was effective. Post test inspection revealed that the insulation had been breached in several places, but the video and temperature data do seem to support the idea that these breaches occurred post firing. I may still add a bit more insulation for added safety though.


Monday, May 7, 2007

Launch video from May 20, 2006


Here is some of the video taken of the first time this yellow rocket was flown. In it's first flight it was flown with a smaller motor, no camera payload, and not boat tail. If you look closely at the video, you can see the shadow cast by the exhaust trail shooting out across the desert behind the launch tower. I also included a photo of both motors that I've flown in this rocket so far. The smaller motor uses steel EMT for the casing. The larger motor uses an aluminum casing and snap ring closures.